
How to Set Up a Docker Reverse Proxy Server

Server efficiency requires proper traffic control for running various applications. Service management plays a vital role in all types of operations including a brewery online store, a craft beer subscription service, or a beer review platform. The deployment of a Docker reverse proxy server enables you to efficiently direct incoming traffic toward target containerized services which makes all applications function properly. The following guideline demonstrates step-by-step procedures for Docker reverse proxy setup which streamlines your application traffic management.
Why Use a Reverse Proxy with Docker?
The middleman functionality of a reverse proxy allows it to redirect client requests through a set of defined rules toward backend resources. The integration between Docker and this tool delivers easy container networking through the capability for several services to use identical external ports and dynamic request management.
Key benefits include:
- Load balancing – Distributes traffic efficiently across containers.
- SSL termination – Offloads HTTPS encryption for improved security.
- Centralized access control – Protects services with authentication and firewall rules.
- Simplified domain management – Routes different domains or subdomains to specific containers.
The installation of a Docker reverse proxy server will be demonstrated step-by-step in the following section.
Step 1: Install Docker and Docker Compose
Complete installation of a reverse proxy server requires Docker and Docker Compose already present on the system. Execute the commands below for installing them if they are not already present.
# Install Docker
curl -fsSL https://get.docker.com | sh
# Install Docker Compose
sudo apt install docker-compose -y
Once installed, verify their versions:
docker –version
docker-compose –version
This ensures that Docker is ready to manage containers and networks effectively.
Step 2: Set Up the Reverse Proxy Network
Docker needs a dedicated network for the reverse proxy to manage traffic between different containers. Create a custom bridge network using:
docker network create proxy_network
This network allows containers to communicate securely without exposing them directly to the internet.
Step 3: Deploy Nginx as a Reverse Proxy
Nginx is a powerful reverse proxy solution that efficiently handles incoming requests. Create a directory for your proxy setup:
mkdir -p ~/docker/reverse-proxy && cd ~/docker/reverse-proxy
Inside this directory, create a docker-compose.yml file:
version: ‘3.8’
services:
reverse-proxy:
image: nginx:latest
container_name: nginx_proxy
ports:
– “80:80”
– “443:443″|
networks:
– proxy_network
volumes:
– ./nginx.conf:/etc/nginx/nginx.conf:ro
restart: unless-stopped
networks:
proxy_network:
external: true
This file tells Docker to pull the latest Nginx image, expose ports 80 (HTTP) and 443 (HTTPS), and connect to the proxy network.
Step 4: Configure Nginx for Reverse Proxy
Create a new nginx.conf file in the same directory with the following content:
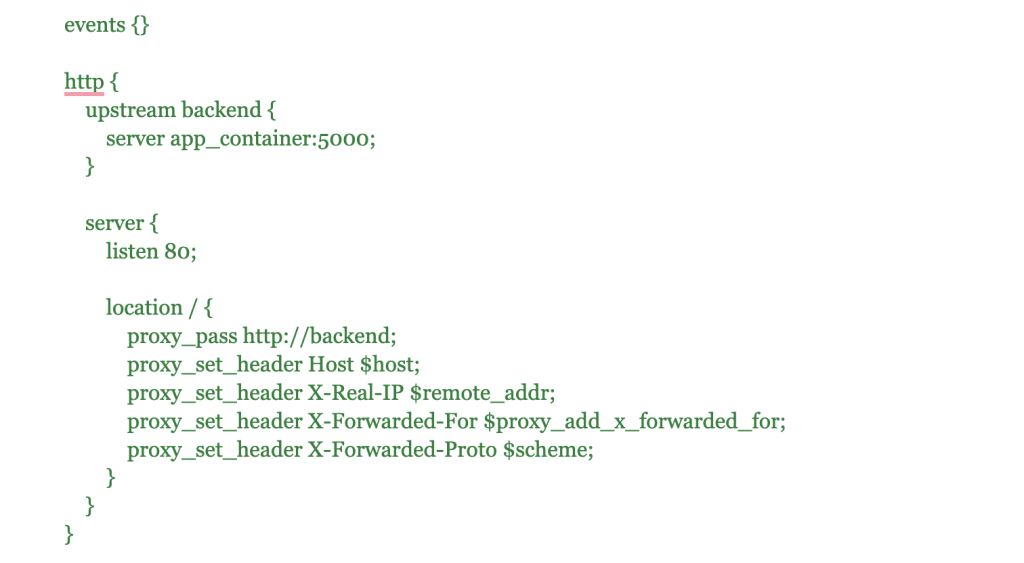
Replace app_container with the actual name of your service container running inside Docker. This configuration directs all traffic from port 80 to the backend service running on port 5000.
Step 5: Start the Reverse Proxy
Now that everything is configured, start the Nginx reverse proxy using Docker Compose:
docker-compose up -d
Use the -d flag to run the container in detached mode, keeping it active in the background. To verify its status, use the following command:
docker ps
This should display the running Nginx container, confirming that your reverse proxy is active.
Step 6: Connect Services to the Proxy
For your services to be accessible through the reverse proxy, they must be on the proxy network. When defining services in docker-compose.yml, add:
networks:
– proxy_network
Restart your services to apply the changes:
docker-compose restart
Once restarted, test by visiting your server’s IP address or domain. The request should automatically route through the Nginx reverse proxy to your service.
Enhancing Security with SSL (Let’s Encrypt)
To enable HTTPS for encrypted connections, you can integrate Certbot with Nginx. First, install the required dependencies:
sudo apt install certbot python3-certbot-nginx -y
Then, obtain and configure an SSL certificate:
sudo certbot –nginx -d yourdomain.com -d www.yourdomain.com
Certbot will automatically modify the Nginx configuration to include SSL settings. Restart Nginx for the changes to take effect:
sudo systemctl restart nginx
Your Docker reverse proxy implements both HTTP and HTTPS security protocols to protect your services thus establishing better reliability and security.
Optimize Your Docker Reverse Proxy for Performance and Security
The Docker reverse proxy server emerges as an effective method to execute efficient control of numerous containerized applications. The deployment of Nginx enables smooth traffic management and enhances both security features and scalability and boosts system performance. A correctly configured reverse proxy serves to simplify both basic and lengthy microservices-based infrastructures.
Looking for additional security for your proxy setup? You can proxy server buy for better privacy and performance when handling sensitive data.
Your Docker reverse proxy installation needs testing with your applications while you adjust configurations to reach maximum performance levels. The proper optimization of your proxy ensures that all your beer-related online platforms stay quick and readily available to users. The smooth and scalable infrastructure lets your customers browse and order craft beer products through a delay-free and easy experience.