
By Colby Chandler
Perhaps the most important lesson I ever learned about beer-and-food pairing concerns the “flavor bridge,” a guiding vehicle using logic and taste buds to connect pint to plate. I’ve organized and prepared beer dinners for well over a decade and, of the many lessons I’ve learned along the way, the flavor bridge is the one I share with everyone, just as my good friend and the unofficial professor of all things beer and food, Colby Chandler from Ballast Point Brewing, shared it with me. And now, I’m excited to share it with you. But first, allow me to take you back in time.
Colby and I worked on our first beer dinner together nearly 15 years ago. He thought it would be good for us to get together at his place ahead of the event to practice some dishes and, of course, drink some beer. That prep session turned into a seven-hour, multi-course evening of indulgence, conversation and enlightenment. That last one came courtesy of the flavor bridge, which not only helps create exceptional beer-and-food pairings but also makes it easy to communicate to the people you are serving.
So, what is the flavor bridge exactly? It’s about examining the flavors and characteristics of a beer, then using them to guide the selection and preparations of the food ingredients you pair with that beer. It can be as simple as you’d like. Take an amber ale for instance; medium-bodied with malt-forward hints of caramel and a kiss of biscuit and cookie. Take one of those elements, then create a part of a dish with that flavor in mind. Think grilled vegetables, pan-seared fish, grilled beef or roasted chicken. The cooking of those ingredients caramelizes natural sugars, creating hints of natural sweetness that will pair beautifully with the flavors of the amber ale. The bridge is the sweet malt and caramelized flavors.
One of the best parts of the flavor bridge is how simple it can be, but I also love how easily you can ramp it up. For instance, an imperial stout’s roasty, chocolaty character make that style a slam-dunk pairing with the meatiness of slow-braised short ribs. Add cocoa or chilis to the ribs’ braising liquid and the pairing gets even more complex and symbiotic. Or you can get look for numerous flavors in a beer then bridge them using multiple components of a dish. An example from one of my pairing dinners is identifying the bitter, lightly sweet, floral and fruity aspects in an IPA, then matching them with the spice blend on a seared duck breast, the bitterness of some sauteed greens, the sweet-spiciness of a curried yam puree and citrusiness of an orange-chili sauce. Playing multiple lanes can take a pairing to the next level and enhance the overall meal.
But first, let’s bring it back to the basics, breaking down the bridge into its four basic C’s: complimentary, contrast, cut and condiment. To best explain the flavor bridge for you, Colby and I are going to break those down one at a time, starting with “complimentary,” which I’ve touched on above. Now, he’ll will share some of his insight and experiences where that C is concerned. Take it away, Colby.
Some of the best bridge pairings work by finding harmonies between the beer and the dish. This can be done by identifying complementary flavor or aroma elements that tie the beer and dish together. Take Ballast Point‘s Victory at Sea Imperial Porter or AleSmith Brewing’s Speedway Stout, both of which pair well with a coffee-rubbed New York steak. The coffee in both beers serves as the bridge flavor to the coffee used on the steak. On the other end of the flavor spectrum, Ballast Point’s Wahoo White Ale is brewed with orange peel and coriander (cilantro seeds), and pairs nicely with ceviche made with cilantro and lime. Not surprisingly, BP’s Abandon Ship Smoked Lager goes great with smoked meats. In fact, when you taste both in the proper order—beer first, then food, then beer again—the taste buds’ interpretation of the beer changes. The second taste of the smoked beer will be quite different, with the smoky flavors subsiding and allowing the other characteristics of the underlying beer style to move to the forefront.”
Colby Chandler, Ballast Point Brewing / San Diego Beer News
We can talk about bridging flavors all day, but nothing would more clearly demonstrate it than actual beer-and-food pairings. In doing so, we wanted to provide something extremely approachable and fun. So, we decided on two burgers on two ends of the taste spectrum, both bridging pint to plate but in completely different ways. Enter the Backyard Burger Beer Bridge Throwdown!
COLBY’S MY YARD BURGER
For my entrant in our burger throwdown, I focused on the Maillard Reaction (pronounced MY-yar), which gives browned foods its distinctive color and flavor. Think of the browning that goes on when you sear a steak, the crust that develops when you bake bread, the darkening of coffee beans and barley malt when they are roasted. Heat is the cause of the chemical reaction between amino acids and reducing sugar that facilitates darkening, richness and a change in texture. Those brown-colored compounds are also known as melanoidins. The Maillard Reaction happens best between 280- 330 degrees Fahrenheit, compared with a higher temp that is associated exclusively with sugar-caramelization.
With our focus determined, it’s time to devise a beer-and-food pairing? Since malted barley undergoes a Maillard reaction during kilning at lower temps and can have caramel flavors from high-temp roasting, I instantly go to an amber or red ale. This type of beer showcases the big flavors from toasty or biscuity to a candied caramelization and will compliment a variety of food options. For this burger battle, I selected Mulligan Irish Red Ale from Second Chance Beer Co. and Barrel-Aged Piper Down Scottish Ale from Ballast Point. Both possess the aforementioned flavors while Mulligan is more subdued than the big-bodied Piper Down.
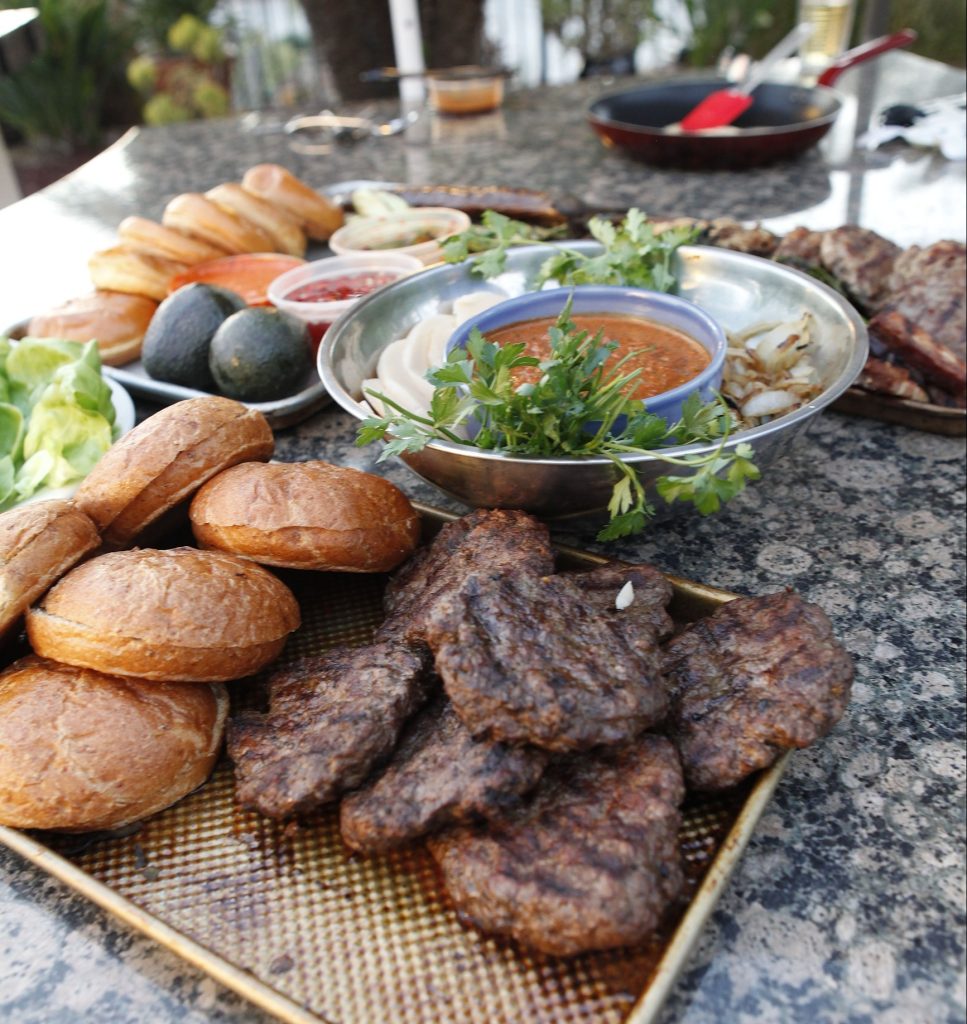
Just about any burger will go great with a red ale, but I wanted to make a Maillard-focused burger; something where essentially every component benefits from that reaction. I started with the deepest-colored bun at the bakery: wheat. I went with a combination of higher-fat ground beef and ground lamb to be browned on the grill. Then I found out that Manchego cheese undergoes a Maillard reaction as it ripens. The cheese’s Spanish origins led me to that country’s famed condiment, romesco sauce, which incorporates toasted nuts, charred tomatoes, roasted and dried peppers. I omitted one ingredient from the sauce, onions, choosing instead to brown them. Notice I didn’t say “caramelize.”
There are so many complementary flavors in the burger, and when you pair it with the beers, everything is elevated to the next level. I really like Mulligan with the romesco sauce and the Piper Down is great at cutting through the fat from the burger and the cheese. From “my yard” to your table. Cheers to San Diego beers!
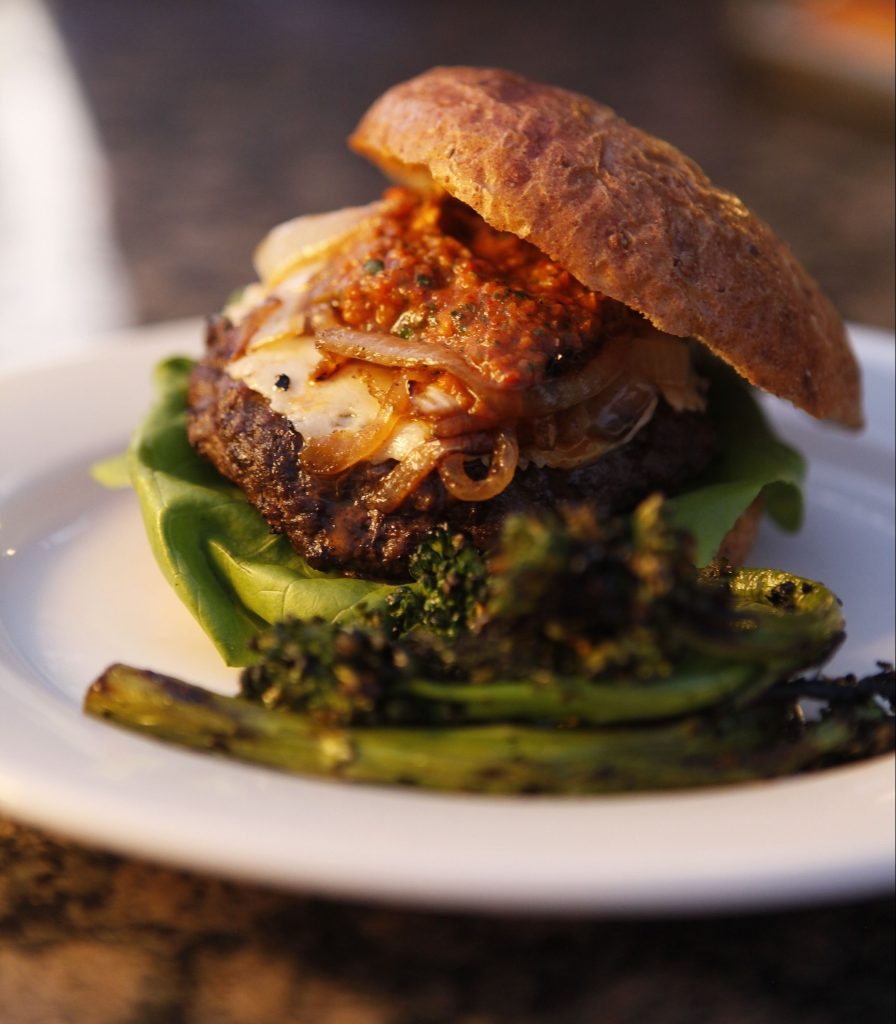
My Yard Burger
with Browned Onions, Manchego & Romesco Sauce
Yield: 6 burgers
- 3 Tbsp salted butter
- 2 large yellow onions, halved and thinly sliced
- pinch sea salt
- 3 Tbsp dry sherry
- 1 lb 80% lean ground beef
- ½ lb ground lamb
- 1 Tbsp paprika
- 1 Tbsp cumin
- 1 Tbsp ground coriander
- salt and freshly ground pepper to taste
- olive oil
- 6 thick slices Manchego cheese
- 6 hamburger buns (look for buns with a browner toast)
- unsalted butter, softened
- butter lettuce
- Romesco Sauce (recipe follows)
Melt the butter in a large sauté pan over medium-high heat. When the butter shows first signs of browning, add onions and season with sea salt. Raise the heat to high and sauté, stirring every 3 minutes, keeping onions spread evenly for maximum contact, until they are brown, about 10 minutes. Deglaze with sherry, using a wooden spoon to loosen any brown bits stuck to the bottom of the pan. Once sherry is evaporated, transfer the onions to a bowl and set aside.
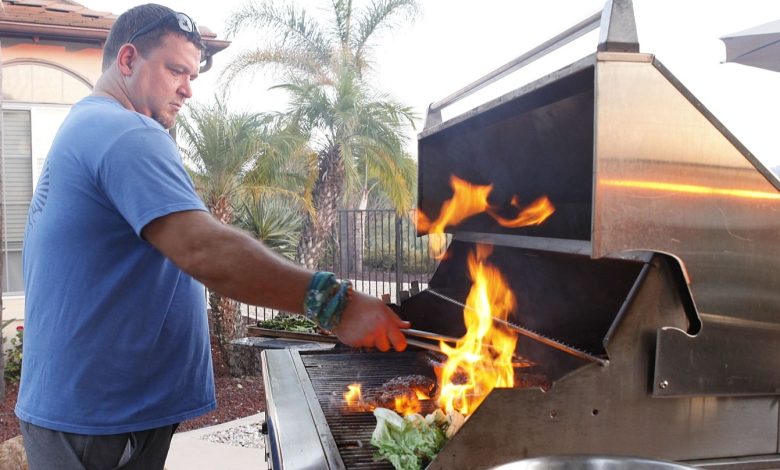
Prepare grill to medium-high heat. In a large bowl, combine beef, lamb, paprika, cumin, coriander, salt and pepper. Form the mixture into 6 equal-sized patties and lightly coat with olive oil. Grill the patties to medium doneness, about 8 minutes. At the same time, brown the cheese in a sauté pan over high heat. Remove from heat and set aside. Remove burgers from the grill and place on a plate. Cover plate with aluminum foil and let burgers rest for 5 minutes. While the burgers rest, butter the hamburger buns and toast on the grill. Remove from heat and set aside.
To serve, build burgers from the bottom-up with the bottom bun, lettuce, burger patty, cheese, a generous dollop of sauce, onions and the top bun. Serve immediately.
Romesco Sauce
- 3 guajillo chilis, stemmed and seeded
- 1 red bell pepper
- 1 small heirloom tomato, stemmed
- 5 cloves garlic
- olive oil (in a spray bottle)
- salt and freshly ground pepper to taste
- ½ cup cilantro
- ½ cup fresh Italian parsley
- 2 Tbsp toasted almonds, sliced
- 2 Tbsp pine nuts, toasted
- 1 Tbsp sherry vinegar
- 2 Tbsp olive oil
Boil 1½ cups of water in a small pot. Turn off the heat, add guajillo chilis, cover and let steep for 15 minutes. Using the burner of a gas stove or broiler, char the red pepper. Transfer the pepper to a bowl, cover with plastic wrap and let steam for 15 minutes. Remove the pepper from the bowl and remove skin, stem and seeds. Place the rehydrated chilis and pepper in the bowl of a food processor.
Preheat broiler. Place tomato and garlic cloves on a baking sheet, spray with olive oil and season with salt and pepper. Place in the oven and broil, using tongs to turn the tomato often, until the skin of the tomato is charred and begins to split, about 20 minutes. Remove from oven and transfer the tomato and garlic to the food processor along with cilantro, parsley, almonds, pine nuts and vinegar. Pulse the food processor until the ingredients are roughly chopped. Then, with the food processor running at a steady pace, slowly stream in the olive oil, being careful not to make the mixture too thin. Serve or store, refrigerated in an airtight container for up to 1 week.
TYSON’S CONVOY BURGER
For my entry in this battle royale (with cheese), I set up camp on the hoppy end of the spectrum and played up the herbs, spices and salt that hops are so fond of, coming up with the “Convoy Burger”. The name is a nod to Convoy Street, the Asian cuisine-studded thoroughfare where you can also find a beer bar near and dear to my heart, O’Brien’s Pub. A fifty-fifty blend of beef and pork makes up the patty, which is topped with all forms of spiced goodness: grilled enoki mushrooms, pickled cucumber and a kimchi aioli. The earthy spice of the aioli and acid from the pickles make for a perfect IPA pairing, amplifying the hoppiness of the beer while those hops, in turn, up the spiciness of the burger.
With it being wet-hop season (the time of year when hops are harvested and extremely fresh, whole-cone hops find their way into beers of many styles, but mostly IPAs), it felt right to feature a beer from Nickel Beer Co. I may be the slightest bit biased, but over the past several years, no local brewery has come anywhere close to brewing as many wet-hop beers as this Julian operation. And for my pairing, I selected Cata-Strata-Phic, a 6.7% alcohol-by-volume wet-hop IPA featuring the sexiest varietal of the moment, Strata.
This beer features firm hop bitterness augmented by floral, earthy, fruity notes. It’s a perfect burger beer! The punchy bitterness and spicy pickled cucumber play off each other, with the spiciness heightening the hoppiness. The sweet saltiness of the vinaigrette the mushrooms are dressed in brings the fruitiness of the beer forward. The blend of meats in the patty and the kimchi mayo add great depth and moisture to each bite, plus tons of umami to keep you sipping on that beer to get the full experience. Bacon is just kind of cheating…it pairs with everything!
Overall, its influence and complexity makes the Convoy Burger a great friend in Cata-Strata-Phic Times, with each lifting the other up!
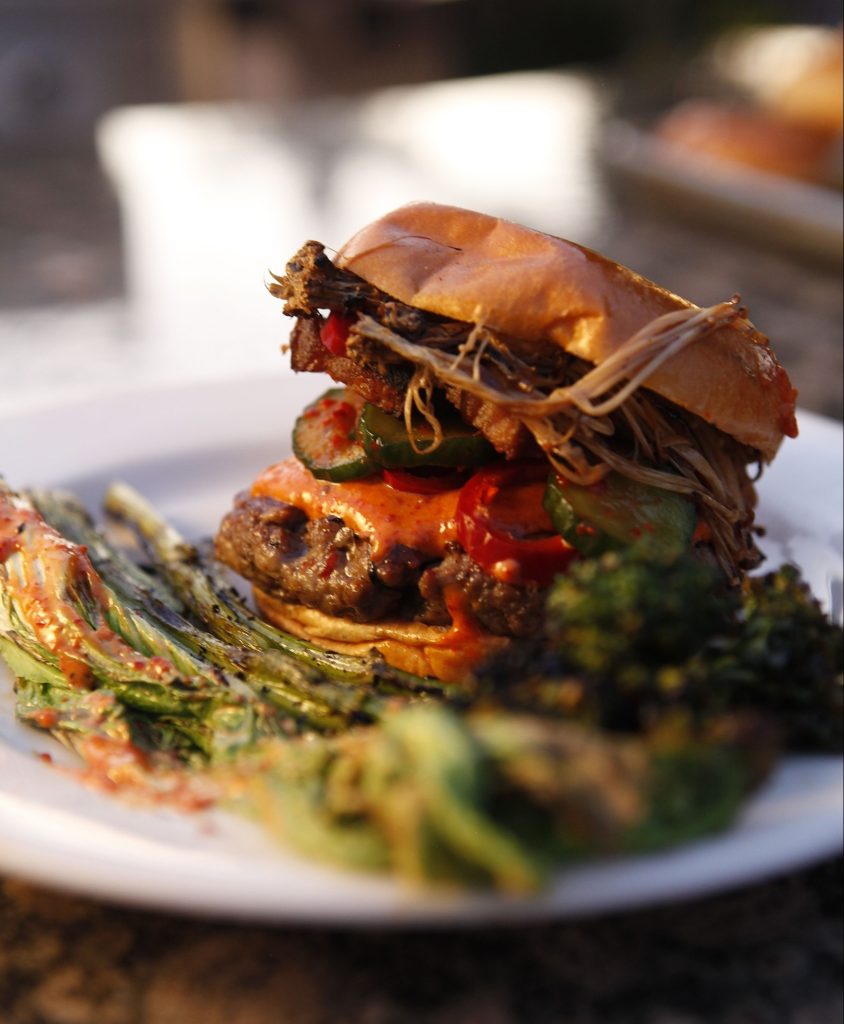
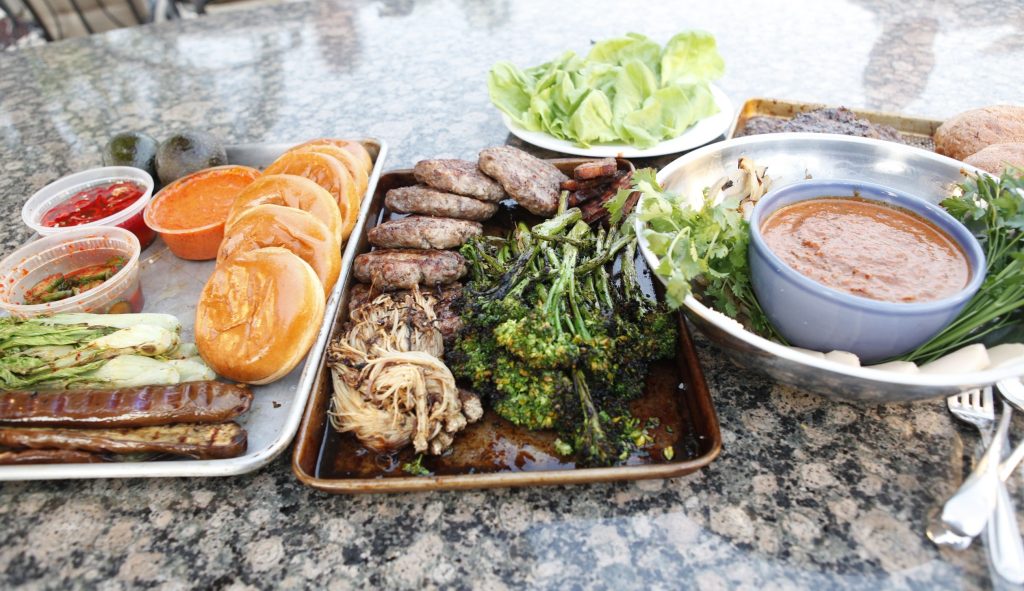
Convoy Burger
with Bacon, Grilled Mushrooms, Korean Cucumber & Kimchi Mayo
Yield: 6 burgers
- 1 lb ground pork
- 1 lb ground beef
- salt and freshly ground pepper to taste
- 3 Tbsp mirin
- 3 Tbsp rice wine vinegar
- 1 Tbsp soy sauce
- 1 3-4 oz pkg enoki mushrooms
- olive oil
- 1 Tbsp sriracha
- 6 brioche hamburger buns
- 12 strips cooked bacon
- Korean Cucumber (recipe follows)
- Kimchi Mayo (recipe follows)
In a large bowl, combine pork and beef, season with salt and pepper and gently mix together. Form into 6 even-sized, relatively flat patties. Place on a plate, cover with plastic wrap and refrigerate.
Prepare grill to medium-high heat. In a mixing bowl, whisk together 1 tablespoon each of mirin, vinegar and soy sauce and set aside. Lightly coat the mushrooms with oil, grill for 2 minutes, then transfer to the mixing bowl. Coat the mushrooms in the soy mixture and set aside.
In a separate bowl, combine the remaining mirin and vinegar with the sriracha. Remove the patties from the refrigerator, place on the grill and cook about 2 minutes on each side. After each flip, glaze the patties with the sriracha mixture, glazing once before removing from the grill.
To serve, build burgers from the bottom-up with the bottom bun, kimchi mayo, mushrooms, burger patty, bacon, cucumbers, more mayo and top bun. Serve immediately.
Korean Cucumber
- 4 English cucumbers, sliced into thin rounds
- 2 Tbsp kosher salt
- 1 Tbsp prepared kimchi paste
- dash agave syrup
In a mixing bowl, use your hands to combine the cucumbers and salt. Transfer the cucumbers to a strainer and let drain for 10 minutes. Transfer the cucumbers back to the mixing bowl, combine with the remaining ingredients and refrigerate for at least 30 minutes before serving.
Kimchi Mayo
- ½ cup Japanese mayonnaise (such as Kewpie)
- ¼ cup strained kimchi
- 1 Tbsp prepared kimchi paste
Place all of the ingredients in a blender or food processor and puree until smooth. Serve or store, refrigerated in an airtight container, for up to 1 week.